Implement Cloudi-Fi into a Prisma Access Environment to enable the captive portal.
Use case:
This article will walk through the implementation of Cloudi-Fi into a Prisma Access Environment to enable the captive portal.
Prerequisites
Before starting, ensure that you have the following prerequisites:
- Access to Prisma Admin Console
- Knowledge of your network’s IP addressing scheme.
- Access to DNS
- Access to Certificate Manager
- Access to Cloudi-Fi Admin Console
Solution overview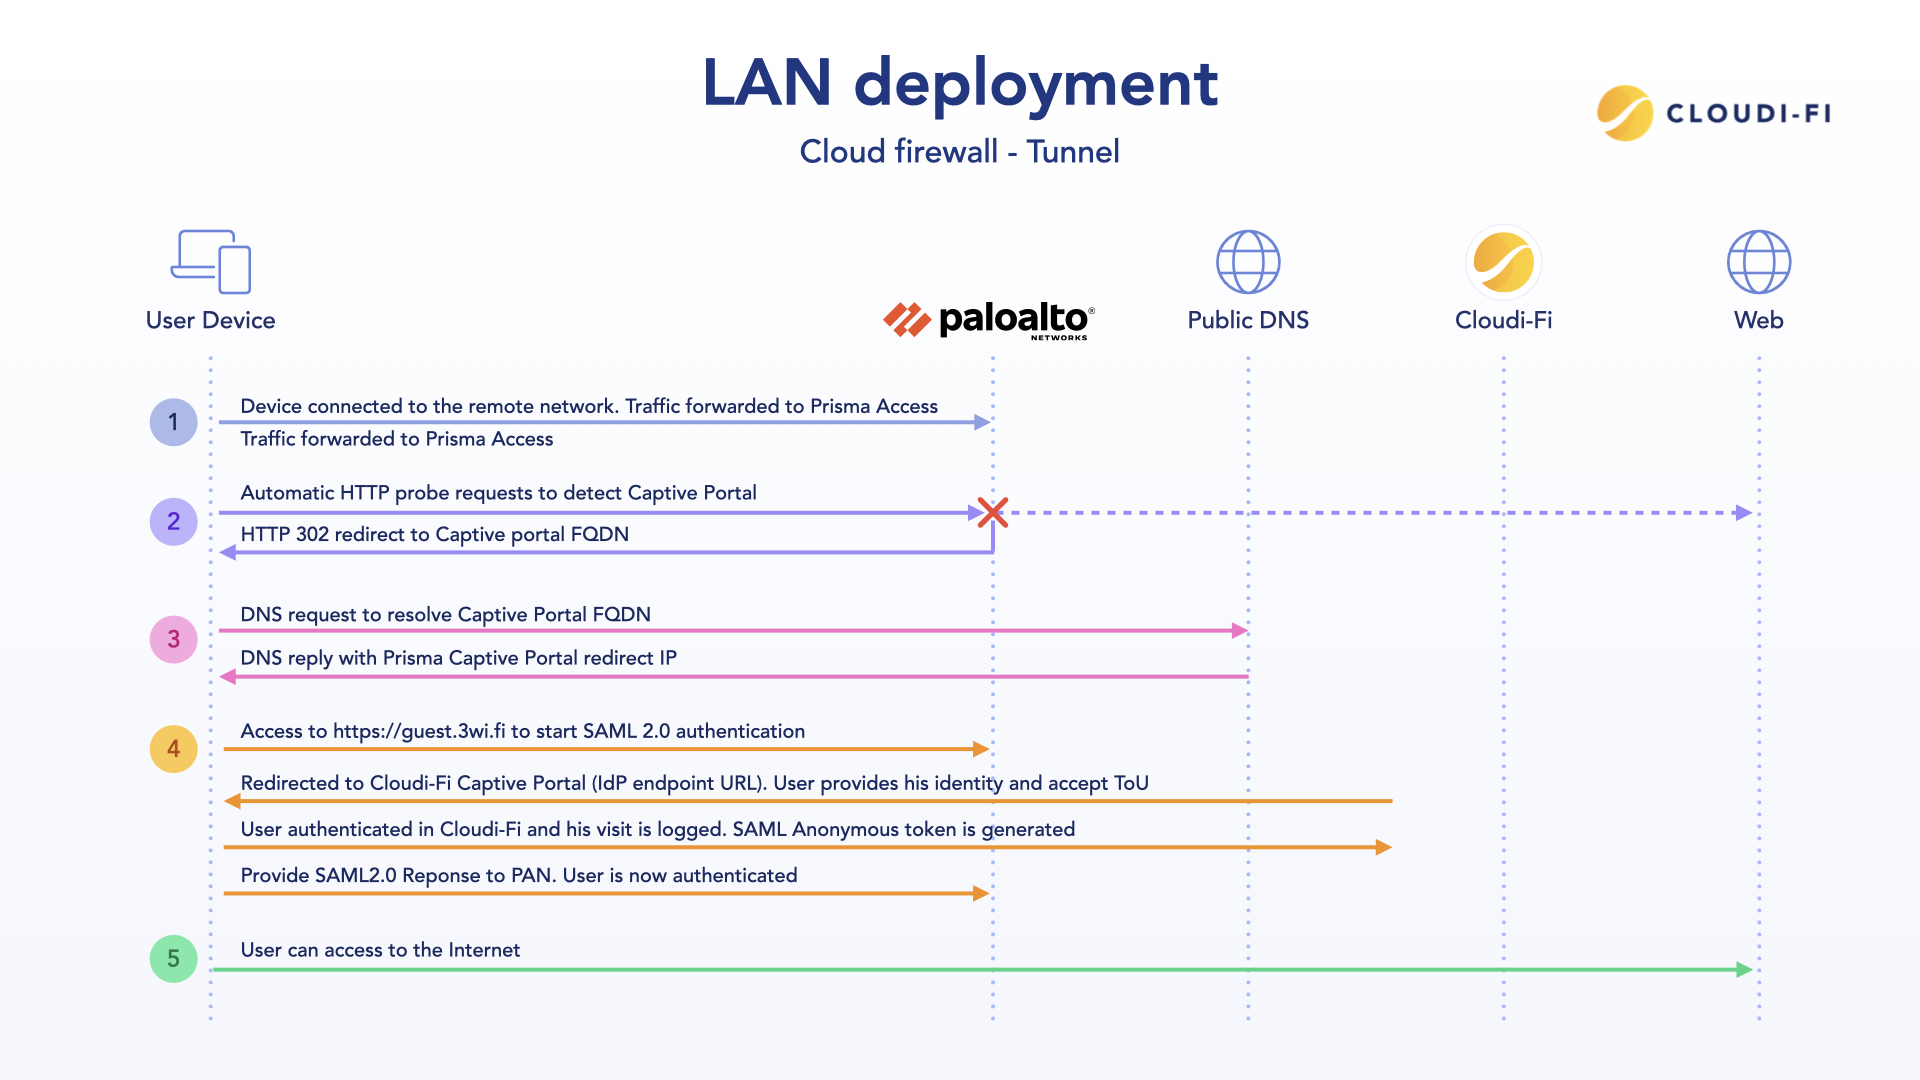
1. DNS Entry for Captive Portal redirect IP
- Create an External DNS entry using your organization's DNS Provider, which points to the
- Captive Portal Redirect IP Address. Example in the below screenshots:
Note: All the configurations should be done using the correct template.
Template mapping is configured in the:
Panorama Cloud Services Configuration Remote Networks
2. Configure SAML Identity Provider (IdP)
SAML Identity Provider
Go to Device Server Profiles > SAML Identity Provider
-
Identity Provider ID: https://login.cloudi-fi.net/auth/saml2/idp/metadata.php
-
Import Cloudi-FI_SAML_cert : https://help.cloudi-fi.com/hc/en-us/articles/9651153750813-Cloudi-Fi-SAML-public-certificate
-
Identity Provider SSO URL = Cloudi-Fi Location URL
-
https://login.cloudi-fi.net/start/<locationhash">
This URL can be found in the Location menu from the Cloudi-Fi admin interface.
|
Original URL format |
https://login.cloudi-fi.net/auth/saml2/idp/SSOService.php?spentityid=spsomething.com&ch=0a2526ed79aa434&lh=145cb1a21a871c& |
|
Palo Alto URL format |
https://login.cloudi-fi.net/start/0a2526ed79aa434/145cb1a21a871c |
- Note: If multiple physical sites are routed behind Palo Alto, create an IdP profile for each physical location.
- Modifying the Identity Provider SSO URL for each IdP profile with the Cloudi-Fi location URL would be best.
Configure SAML Authentication Profile
Go to Device > Authentication Profile
-
Type: SAML
-
IdP Server Profile: Select the Cloudi-Fi IdP profile created at step 1
-
Certificate profile: Create a new profile and import the Cloudi-Fi_IdP_cert (see screenshot below)
-
SAML Attributes / Username Attribute: token
-
SAML Attributes / User Group Attribute: profile
Certificate profile
Create Web-forms
- Create a specific web form that will be used in the Authentication policy:
- Create one web form per location if you have multiple locations behind one Palo Alto equipment.
- Go to Objects -> Authentication -> Add.
3. Configure Captive portal settings
- Go to Device -> User-Identification -> Captive Portal Settings -> Edit
- Example FQDN: customer.cloudi-fi.net
- This FQDN is mentioned at the beginning of this article and resolves the Prisma Access Captive Portal IP address.
- The idle timer and timer should equal and match the session lifetime configured in the Cloudi-Fi captive portal.
- This FQDN appended with port 6082 (Required for captive portals using SSL/TLS profiles)will also be used during the SAML authentication as Service Provider EntityID and must be declared in the Cloudi-Fi administration interface.
Cloudi-Fi admin: Settings > Integrations > Palo Alto Networks Prisma Access
Step 4: Configure policy
Create a custom URL category
- We will create custom URL categories and will use them to make the Walled Garden (URL accessible by the user before being authenticated)
-
Go to Objects Custom Objects URL Category Add
- Profile Name: Cloudi-Fi_portal
- Type: URL List
- Sites:
*.cloudi-fi.net
-
If you have social media in your captive portal, create another custom URL category.
- Domains will be provided by the Cloudi-Fi team.
Create Security Rules
- Go to Policies -> Security -> Rules
- We shall create four security rules:
-
1. Guest DNS Proxy rule: to allow the Guest Layer3 IP to reach the DNS server
- Source: Guest gateway IP address (Zone Guest)
- Destination: DNS server(s) configured in the DNS-Proxy
- Application: DNS
- Action Allow
-
2. Whitelist rule: to allow an unauthenticated user to access the captive portal
- Source: Guest network (Zone Guest)
- User: Unknown
- Destination: Any (Zone External)
- Application: Any (you can restrict as you wish. At least web-browsing and SSL)
- URL Filtering: Cloudi-Fi custom categories
- Action: Allow
-
3. Guest-Allowed: Allow authenticated users to access to the Internet
- Source: Guest network (Zone Guest)
- User: Know-User
- Destination: Any (Zone External)
- Application: Any (you can restrict as you wish. At least web-browsing and SSL)
- Action: Allow
- Profile Settings: URL Filtering enabled
-
4. Guest-DenyAll: Explicit deny to prevent the Guest network from accessing other internal resources (optional with default PAN policy behavior but recommended)
- Source: Guest network (Zone Guest)
- Destination: Any (All zones)
- Application / Services: Any
- Action: Deny
Create authentication rule
- This rule will redirect the unauthenticated users to the Cloudi-Fi captive portal.
- Go to Policies -> Authentication -> Add
- Source: Guest Network (Guest zone)
- User: Unknown
- Destination: Any (External Zone)
- Service: HTTP
- Action: Authentication enforcement: Cloudi-Fi web form created at step 1
Note that if multiple physical sites are behind the PAN, you must create one authentication rule per physical location with the appropriate web form.
Logs
Troubleshooting
- Verify DNS resolution to correct Captive Redirect IP Provided by Prisma from FQDN.
- Verify installation of Certificate
- Contact support@cloudi-fi.com with any other issues.
What's next?
Congratulations on enabling Cloudi-Fi's Captive Portal in Prisma Access!